Difference Between Straightness and Flatness
In engineering and manufacturing, precision is critical. Each part or component must meet certain standards and specifications to ensure its functionality and performance. Among the many parameters used to evaluate part quality, two important and often misunderstood concepts are straightness and flatness. Although they may seem similar at first glance, they have different meanings and applications. In this article, we’ll take a closer look at the differences between straightness and flatness, explaining their definitions, how to measure them, and their practical applications.


Definition of straightness and flatness:
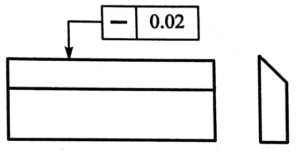
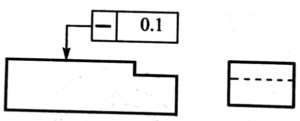
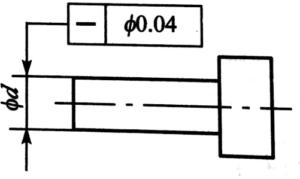
Straightness refers to the geometric property of a straight line or surface being completely straight without any curves or bends. It describes the absence of twisting or warping, ensuring the part retains its linear shape when measured. Straightness is usually measured relative to a reference line or axis and expressed as the deviation from that reference in specific units such as millimeters or inches.
Flatness, on the other hand, relates to the geometric properties of a perfectly flat surface that does not deviate greatly from the ideal shape. It features no high or low spots across the entire surface, ensuring a uniform and level condition. Flatness is measured relative to a reference plane or datum and also involves expressing the deviation from that reference in specific units (usually microns or millimeters).
Straightness measurement method:
1. Optical method: This method uses laser interferometry to measure the straightness of an object. A laser beam is projected onto an object and the reflected beam is captured by a sensor. By analyzing the interference pattern of the reflected beam, the straightness deviation can be calculated.
2. Mechanical method: This method involves the use of precision mechanical equipment, such as a dial indicator or linear displacement sensor, to measure deviations from straightness. These devices are mounted on a reference surface and move along the object being measured. Any change in the reading indicates a deviation in straightness.
3. Coordinate measurement machine (CMM): CMMs are high-precision machines used to measure various parameters, including straightness. The probe moves along the surface of the object and records its position at multiple points. The collected data is then analyzed to determine the object’s straightness.
4. Laser tracker: The method uses a laser tracker, a portable, high-precision measurement device. The laser tracker emits a laser beam toward a retroreflector mounted on the object being measured. It then tracks the position of the retroreflector as it moves along the object, thereby measuring straightness.
5. Image processing: The method involves capturing an image of an object using a camera or other imaging device. The images are then processed using computer algorithms to detect any deviations from straightness. This method is often used to measure the straightness of long objects, such as rails or pipes.
The choice of measurement method depends on the specific application, accuracy requirements, and the size and shape of the object being measured.
Applications:
Straightness and flatness have different applications in various industries, including automotive, aerospace and machining. Understanding their differences is critical to ensuring the quality and functionality of manufactured parts.
Straightness is especially important in applications involving shafts, axles, or any rotating part. For example, in the automotive industry, the straightness of a crankshaft or camshaft is critical to maintaining proper alignment and reducing friction. In the aerospace industry, the straightness of an aircraft wing or fuselage ensures proper airflow and aerodynamic performance. In machining, straightness is critical to maintaining the accuracy of linear guides, axes and precision equipment.
Flatness is important in applications where surface contact is critical, such as gasket sealing, optical systems or precision assembly. For example, in the automotive industry, engine components such as cylinder heads or engine blocks require high flatness to create an effective seal and prevent leaks. In the electronics industry, flatness is critical for mounting components, ensuring proper heat dissipation, and ensuring reliable operation of circuits. Flatness is also critical when manufacturing optical lenses, mirrors or semiconductor wafers to maintain the distortion-free and high-resolution performance of these components.

Leave a Reply
Want to join the discussion?Feel free to contribute!